-
[android] android 고급 위젯 다루기1app/android 2021. 10. 28. 19:00반응형
날짜와 시간 관련 위젯
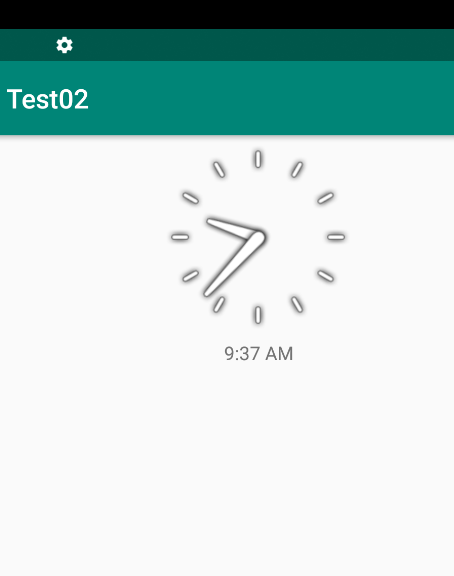
아날로그시계, 디지털시계
화면에 시간을 표시하는 위젯으로 시계를 표현하는 용도
View 클래스에서 상속받기 때문에 backgroud 속성 등을 설정 가능하다
-DigitakClock은 textColor 같은 속성도 설정 가능하다
<?xml version="1.0" encoding="utf-8"?>
<LinearLayout xmlns:android="http://schemas.android.com/apk/res/android"
    xmlns:app="http://schemas.android.com/apk/res-auto"
    xmlns:tools="http://schemas.android.com/tools"
    android:layout_width="match_parent"
    android:layout_height="match_parent"
    android:orientation="vertical"
    tools:context=".MainActivity">

    <AnalogClock
        android:layout_width="match_parent"
        android:layout_height="wrap_content" />

    <DigitalClock
        android:layout_width="match_parent"
        android:layout_height="wrap_content"
        android:gravity="center" />

</LinearLayout>
실행결과
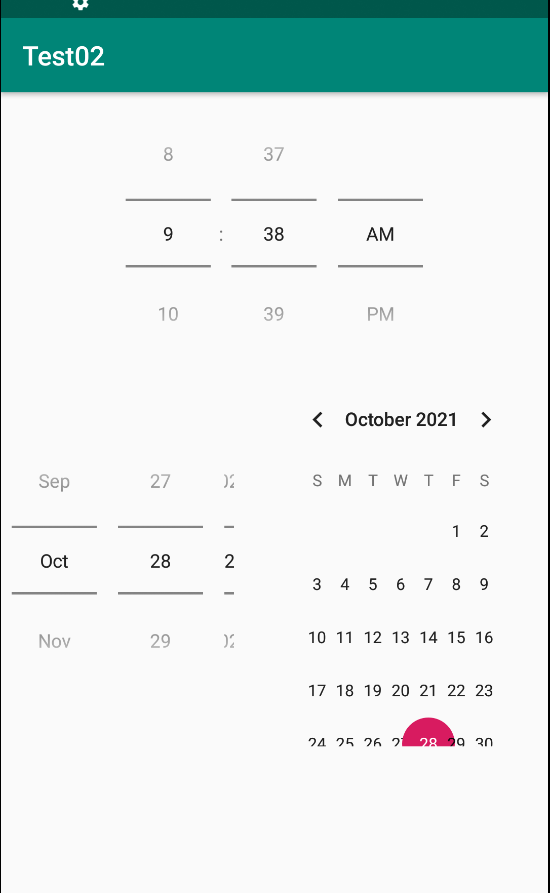
타임피거, 데이트피커, 캘린더 뷰
타임피커(TimePicker) : 시간 표시와 조절
데이트피커(DatePicker)와 캘린더뷰(CalendarView) : 날짜 표시와 조절
캘린더뷰 xml 속성
showWeekNumber : 현재 몇 주차인지를 각 주의 맨 앞에 출력한다
디폴드는 true이지만 false로 하는 것이 더 깔끔하고 보기 좋다
<?xml version="1.0" encoding="utf-8"?>
<LinearLayout xmlns:android="http://schemas.android.com/apk/res/android"
    xmlns:app="http://schemas.android.com/apk/res-auto"
    xmlns:tools="http://schemas.android.com/tools"
    android:layout_width="match_parent"
    android:layout_height="match_parent"
    android:orientation="vertical"
    tools:context=".MainActivity">

    <TimePicker
        android:timePickerMode="spinner"
        android:layout_width="match_parent"
        android:layout_height="wrap_content" />

    <DatePicker
        android:datePickerMode="spinner"
        android:layout_width="match_parent"
        android:layout_height="wrap_content" />
</LinearLayout>
실행결과
<예제> 날짜/시간 예약 앱 만들기
activity_main.xml
<?xml version="1.0" encoding="utf-8"?>
<LinearLayout xmlns:android="http://schemas.android.com/apk/res/android"
    xmlns:app="http://schemas.android.com/apk/res-auto"
    xmlns:tools="http://schemas.android.com/tools"
    android:layout_width="match_parent"
    android:layout_height="match_parent"
    android:orientation="vertical"
    tools:context=".MainActivity">

    <TextView
        android:layout_width="wrap_content"
        android:layout_height="wrap_content"
        android:text="20211666 ㄱㅇㅇ" />

    <LinearLayout
        android:layout_width="match_parent"
        android:layout_height="wrap_content"
        android:orientation="vertical">

        <Chronometer
            android:id="@+id/chronometer1"
            android:layout_width="match_parent"
            android:layout_height="wrap_content"
            android:format="예약이 걸린 시간 %s "
            android:gravity="center"
            android:textSize="20dp" /> // 타이머 설정

        <Button
            android:id="@+id/btnStart"
            android:layout_width="match_parent"
            android:layout_height="wrap_content"
            android:text="예약 시작" /> //예약 버튼 만들기


    </LinearLayout>

    <RadioGroup
        android:layout_width="wrap_content"
        android:layout_height="wrap_content">

        <RadioButton
            android:id="@+id/rdoCal"
            android:layout_width="wrap_content"
            android:layout_height="wrap_content"
            android:text="날짜 설정 (캘린더뷰)" /> // 날짜 라디오버튼 만들기

        <RadioButton
            android:id="@+id/rdoTime"
            android:layout_width="wrap_content"
            android:layout_height="wrap_content"
            android:text="시간 설정" /> // 시간 라디오버튼 만들기

    </RadioGroup>

    <LinearLayout
            android:layout_width="match_parent"
            android:layout_height="0dip"
            android:layout_weight="1" > // 레이아웃을 다시만듬 안보이게할거기때문

            <FrameLayout
                android:layout_width="match_parent"
                android:layout_height="match_parent"
                android:layout_gravity="center" > // framelayout 사용한거 잘보셈

            <CalendarView
                android:id="@+id/calendarView1"
                android:layout_width="match_parent"
                android:layout_height="match_parent"
                android:showWeekNumber="false" /> // 달력만들기

                <TimePicker
                    android:id="@+id/timePicker1"
                    android:layout_width="match_parent"
                    android:layout_height="match_parent"
                    android:timePickerMode="spinner" /> // 타이머

            </FrameLayout>
        </LinearLayout>


        <LinearLayout
            android:layout_width="match_parent"
            android:layout_height="wrap_content"
            android:orientation="vertical"
            android:background="#CCCCCC"> // 완료레이아웃 만들기

            <Button
                android:id="@+id/btnEnd"
                android:layout_width="wrap_content"
                android:layout_height="wrap_content"
                android:text="예약완료" />

            <TextView
                android:id="@+id/tvYear"
                android:layout_width="wrap_content"
                android:layout_height="wrap_content"
                android:text="0000" />

        </LinearLayout>

</LinearLayout>
MainActivity.kt
package kr.ac.dongyang.project6_1

import android.graphics.Color
import androidx.appcompat.app.AppCompatActivity
import android.os.Bundle
import android.os.SystemClock
import android.view.View
import kotlinx.android.synthetic.main.activity_main.*

class MainActivity : AppCompatActivity() {

    override fun onCreate(savedInstanceState: Bundle?) {
        super.onCreate(savedInstanceState)
        setContentView(R.layout.activity_main)

        title = "시간 예약"

        timePicker1.visibility = View.INVISIBLE
        calendarView1.visibility = View.INVISIBLE // 처음에 달력이랑 타이머안보영

        rdoCal.setOnClickListener {
            timePicker1.visibility = View.INVISIBLE
            calendarView1.visibility = View.VISIBLE // rdoCal 을 누르면 캘린더만보이기
        }
        rdoTime.setOnClickListener {
            timePicker1.visibility = View.VISIBLE
            calendarView1.visibility = View.INVISIBLE // rdoTime을 누르면 시간설정만 보이기
        }

        btnStart.setOnClickListener {
            chronometer1.base = SystemClock.elapsedRealtime()
            chronometer1.start()
            chronometer1.setTextColor(Color.RED) // 시작 버튼 액션
        }

        var selectYear : Int = 0
        var selectMonth : Int = 0
        var selectdayOfMonth : Int = 0
        btnEnd.setOnClickListener {
            chronometer1.stop()
            chronometer1.setTextColor(Color.BLUE)

            tvYear.text = "" + selectYear + "년" + selectMonth + "월" + selectdayOfMonth + "일" + timePicker1.currentHour + "시" + timePicker1.currentMinute + "분"
        } // 끝에 완료누르면 총 설정한거 나오기

        calendarView1.setOnDateChangeListener{ calendarView1, i, i2, i3 ->
            selectYear = i
            selectMonth = i2
            selectdayOfMonth = i3
        }


    }
}
실행결과

완성~~~~~~~~
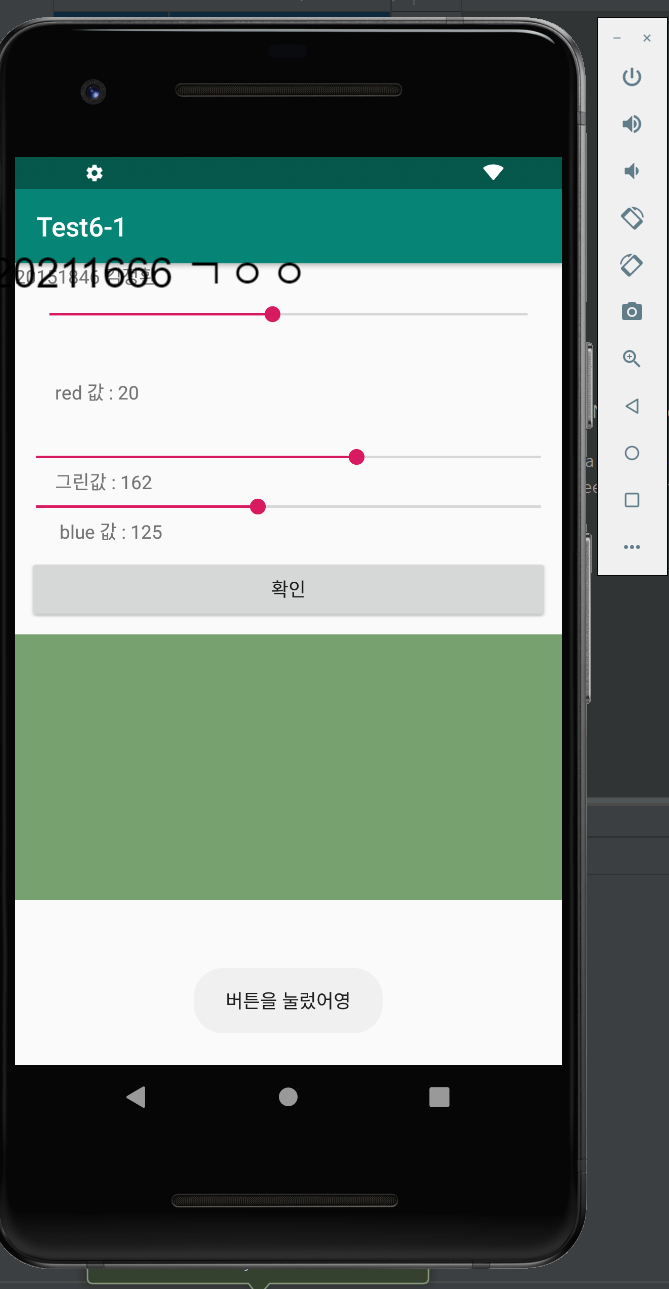
시크바(SeekBar)
프로그래스바의 하위 클래스로 사용법이 비슷하다
사용자가 터치로 임의 조절이 가능하다
음량을 조절하거나 동영상 재생 시 사용자가 재생 위치를 지정하는 용도로 사용할 수 있다
레이팅바(RatingBar)
진행 상태를 별 모양으로 표시
프로그레스바의 하위 클래스로 사용법이 비슷하다
서적, 음악, 영화 등에 대한 선호도를 나타날때 주로 사용한다
주로 사용되는 xml 속성
-numStrars
<예제> 시크바와 레이팅바를 활용한 예제
activity_main.xml
<?xml version="1.0" encoding="utf-8"?>
<LinearLayout xmlns:android="http://schemas.android.com/apk/res/android"
    xmlns:app="http://schemas.android.com/apk/res-auto"
    xmlns:tools="http://schemas.android.com/tools"
    android:layout_width="match_parent"
    android:layout_height="match_parent"
    android:orientation="vertical"
    tools:context=".MainActivity">

    <TextView
        android:id="@+id/text"
        android:layout_width="wrap_content"
        android:layout_height="wrap_content"
        android:text="20211666 ㄱㅇㅇ" />

    <SeekBar
        android:id="@+id/redBar"
        android:layout_margin="10dp"
        android:layout_width="match_parent"
        android:layout_height="wrap_content"
        android:max="255"
        android:progress="20" />

    <TextView
        android:id="@+id/redText"
        android:layout_margin="30dp"
        android:layout_width="wrap_content"
        android:layout_height="wrap_content"
        android:text="red 값 : " />

    <SeekBar
        android:id="@+id/greenBar"
        android:layout_width="match_parent"
        android:layout_height="wrap_content"
        android:max="255"
        android:progress="50" />

    <TextView
        android:id="@+id/greenText"
        android:layout_marginLeft="30dp"
        android:layout_width="wrap_content"
        android:layout_height="wrap_content"
        android:text="green 값 : " />


    <SeekBar
        android:id="@+id/blueBar"
        android:layout_width="match_parent"
        android:layout_height="wrap_content"
        android:max="255"
        android:progress="125" />

    <TextView
        android:id="@+id/blueText"
        android:layout_marginLeft="30dp"
        android:layout_width="wrap_content"
        android:layout_height="wrap_content"
        android:text="blue 값: " />

    <Button
        android:id="@+id/btnOk"
        android:layout_margin="10dp"
        android:layout_width="match_parent"
        android:layout_height="wrap_content"
        android:text="확인" />

    <View
        android:id="@+id/dpView"
        android:background="#000000"
        android:layout_width="match_parent"
        android:layout_height="200dp" />


</LinearLayout>
MainActivity.kt
package kr.ac.dongyang.test6_1

import android.graphics.Color
import androidx.appcompat.app.AppCompatActivity
import android.os.Bundle
import android.widget.SeekBar
import android.widget.Toast
import kotlinx.android.synthetic.main.activity_main.*

class MainActivity : AppCompatActivity() {

    var red = 0
    var green = 0
    var blue = 0

    override fun onCreate(savedInstanceState: Bundle?) {
        super.onCreate(savedInstanceState)
        setContentView(R.layout.activity_main)

        red = redBar.progress
        green = greenBar.progress
        blue = blueBar.progress

        redText.text = "red 값 : " + red
        greenText.text = "green 값 : " + green
        blueText.text = " blue 값 : " + blue

        redBar.setOnSeekBarChangeListener(object : SeekBar.OnSeekBarChangeListener {
            override fun onProgressChanged(p0: SeekBar?, p1: Int, p2:Boolean) {
                red = p1
                greenText.text = "레드값 : " + red
            }
            override fun onStartTrackingTouch(p0: SeekBar?) {
            }
            override fun onStopTrackingTouch(p0: SeekBar?) {
            }
        })

        greenBar.setOnSeekBarChangeListener(object : SeekBar.OnSeekBarChangeListener {
            override fun onProgressChanged(p0: SeekBar?, p1: Int, p2:Boolean) {
                green = p1
                greenText.text = "그린값 : " + green
            }
            override fun onStartTrackingTouch(p0: SeekBar?) {
            }
            override fun onStopTrackingTouch(p0: SeekBar?) {
            }
        })

        blueBar.setOnSeekBarChangeListener(object : SeekBar.OnSeekBarChangeListener {

            override fun onProgressChanged(p0: SeekBar?, p1: Int, p2:Boolean) {
                blue = p1
                greenText.text = "블루값 : " + blue
            }
            override fun onStartTrackingTouch(p0: SeekBar?) {
            }
            override fun onStopTrackingTouch(p0: SeekBar?) {
            }
        })

        //람다식표현(OnclickListener (interface)는 abstract method 가 onclick 하나이다)

        btnOk.setOnClickListener {
            dpView.setBackgroundColor(Color.rgb(red, green, blue))
            Toast.makeText(applicationContext, "버튼을 눌렀어영",
                Toast.LENGTH_LONG).show()
        }


    }
}
실행결과
이런식으로도 처리 가능하다
책의 있길래 퍼왔당ㅎㅎㅎㅎㅎㅎㅎㅎㅎㅎㅎㅎㅎㅎ(내가만든거 아뉨)
 반응형
반응형'app > android' 카테고리의 다른 글
[android] android 번외 로그인 페이지 만들기 (0) 2021.10.28 [android] android 고급 위젯 다루기2 (0) 2021.10.28 [android] android 레이아웃 익히기 (0) 2021.10.28 [android] android 기본 위젯 익히기2 (0) 2021.10.28 [android] android 기본 위젯 익히기1 (0) 2021.10.28