-
[인증/보안] CookiecodeStates front-end/node(server) 2023. 3. 7. 23:53반응형
목차
📌 Cookie
📍 Cookie
서버에서 클라이언트에 영속성있는 데이터를 저장하는 방법
서버는 클라이언트의 쿠키를 이용하여 데이터를 가져올 수 있다
http 프로토콜의 무상태성을 보완해주는 작업
보안 목적이 아니다 !!!
쿠키를 사용하는 대표적인 예시

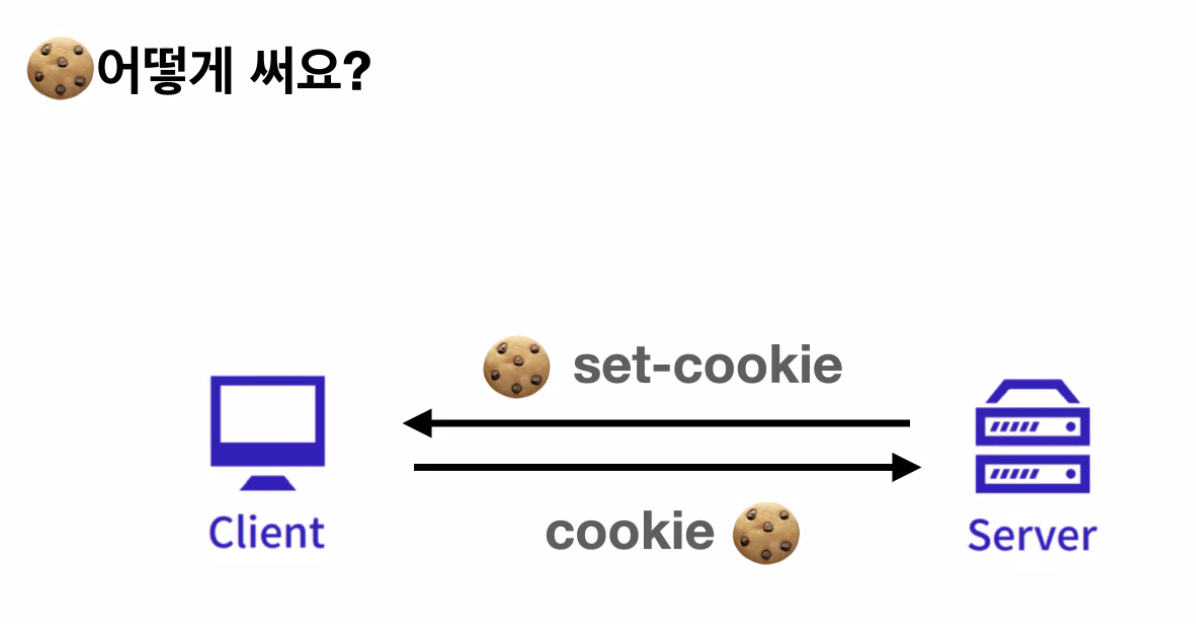
쿠키를 사용하는 방법
쿠키는 헤더를 통해서 사용한다(내가 만든 쿠키 헤더에 담았지 ~~)
🔗 쿠키 옵션 종류
- Domain : 서버의 접속할 수 있는 이름
- Path : 세부 경로, 서버가 라우팅할 때 사용하는 경로를 의미
- MaxAge or Expries : 쿠기가 유효한 기간을 저아는 옵션
- Secure : 사용하는 프로토콜에 따른 쿠키의 전송 여부를 결정하는 옵션
- HttpOnly : 자바스크립트로 브라우저의 쿠키에 접근이 가능한지 여부를 결정
- SameSite : Cross-Origin 요청을 받은 경우, 요청에서 사용한 메서드와 해당 옵션의 조합을 기준으로 서버의 쿠키 전송 여부를 결정
#sameSite 옵션
Lax : 사이트가 서로 달라고, GET요청이라면 쿠키 전송이 가능
Strict : 사이트가 서로 다르면, 쿠키 전송이 불가능
None : 사이트가 달라고, 모든(GET,POST,PUT 등)요청에 대해 쿠키 전송 가능
🔗 쿠키를 이용한 상태 유지
쿠키의 특성을 이용하여 서버는 클라이언트에 인증정보를 담은 쿠키를 전송, 전달받은 쿠키를 서버에 요청과
함께 전송하여 Satateless한 인터넷 연결을 Stateful하게 유지할 수 있다.
But!!! 기본적으로 쿠키 수명은 짧고 HttpOnly을 사용하지 않으면 JS를 이용해 쿠키 접근할 수 있기 때문에 민감한 정보 X
🔗 [실습] 쿠키를 활용하여 로그인 상태 유지

CORS 설정
클라이언트와 서버가 쿠키를 주고 받기 위해서 꼭 필요한 설정
const corsOptions = {

	// client는 http://localhost:3000 을 이용하게 됩니다.
  origin: "http://localhost:3000",

	// cookie는 인증 정보를 포함하는 경우가 많으므로 credentials도 설정해줍니다.
  credentials: true,

	// 허용할 메소드를 배열에 담아서 작성해줍니다.
  methods: ['GET', 'POST', 'OPTION']

};
Property

쿠키로 로그인 유지 구현하기
1. 클라이언트 : 서버로 로그인 요청을 보내기
client/src/pages/Login.js
import React, { useState } from 'react';
import axios from 'axios';

export default function Login() {
  const [loginInfo, setLoginInfo] = useState({
    userId: '',
    password: '',
  });
  const [checkedKeepLogin, setCheckedKeepLogin] = useState(false);
  const [errorMessage, setErrorMessage] = useState('');
  const handleInputValue = (key) => (e) => {
    setLoginInfo({ ...loginInfo, [key]: e.target.value });
  };
  const loginRequestHandler = () => {
    /*
    TODO: Login 컴포넌트가 가지고 있는 state를 이용해 로그인을 구현합니다.
    로그인에 필요한 유저정보가 충분히 제공되지 않았다면 에러메시지가 나타나도록 구현하세요.
    return axios
      .post(login을 담당하는 endpoint)
      .then((res) => {
        로그인에 성공했다면 응답으로 받은 데이터가 Mypage에 렌더링되도록 State를 변경하세요.
      })
      .catch((err) => {
        로그인에 실패했다면 그에 대한 에러 핸들링을 구현하세요.
      });
    */
  };

  return (
    <div className='container'>
      <div className='left-box'>
        <span>
          Education
          <p>for the</p>
          Real World
        </span>
      </div>
      <div className='right-box'>
        <h1>AUTH STATES</h1>
        <form onSubmit={(e) => e.preventDefault()}>
          <div className='input-field'>
            <span>ID</span>
            <input type='text' data-testid='id-input' onChange={handleInputValue('userId')} />
            <span>Password</span>
            <input
              type='password'
              data-testid='password-input'
              onChange={handleInputValue('password')}
            />
            <label className='checkbox-container'>
              <input type='checkbox' onChange={() => setCheckedKeepLogin(!checkedKeepLogin)} />
              {' 로그인 상태 유지하기'}
            </label>
          </div>
          <button type='submit' onClick={loginRequestHandler}>
            LOGIN
          </button>
          {errorMessage ? (
            <div id='alert-message' data-testid='alert-message'>
              {errorMessage}
            </div>
          ) : (
            ''
          )}
        </form>
      </div>
    </div>
  );
}
튜토리얼
const loginRequestHandler = () => {
	// 아이디 비밀번호 로그인정보로 변수로 선언
	const { userId, password } = loginInfo;
	// 우선 아이디, 비밀번호 중 하나라도 입력이 되지 않았다면 에러를 띄우도록 코드를 작성
    if (!userId || !password) {
      setErrorMessage('아이디와 비밀번호를 입력하세요');
      return;
    } else {
      setErrorMessage('');
    }
	//Axios 요청을 보낼 때, 로그인을 처리하는 엔드포인트를 입력(로그인정보(아이디,비밀번호),로그인유지체크박스 입력)
	return axios
  	    .post('http://localhost:4000/login', { loginInfo, checkedKeepLogin })
	// 로그인 처리되고 로그인 정보를 보낸다
     .then((res) => {
       setIsLogin(true);
       setUserInfo(res.data);
      })
      // 오류 난다면 에러메시지와 함께 401 에러 처리
      .catch((err) => {
        if (err.response.status === 401) {
          setErrorMessage('로그인에 실패했습니다.');
        }
      });
  };
client/src/App.js
import './App.css';
import { BrowserRouter, Routes, Route } from 'react-router-dom';
import Login from './pages/Login';
import Mypage from './pages/Mypage';
import React, { useEffect, useState } from 'react';
import axios from 'axios';

// 모든 요청에 withCredentials가 true로 설정됩니다.
axios.defaults.withCredentials = true;

function App() {
  const [isLogin, setIsLogin] = useState(false);
  const [userInfo, setUserInfo] = useState(null);

  const authHandler = () => {
    /*
    TODO: 초기 화면 렌더링시, 서버에 유저 정보를 요청하여 Login 또는 Mypage가 렌더링되도록 구현합니다.
    return axios
      .get(유저의 정보를 담당하는 endpoint)
      .then((res) => {
        인증에 성공했다면 응답으로 받은 데이터가 Mypage에 렌더링되도록 State를 변경하세요.
      })
      .catch((err) => {
        인증에 실패했다면 그에 대한 에러 핸들링을 구현하세요.
      });
    */
  };

  useEffect(() => {
    // 컴포넌트 생성 시 아래 함수가 실행됩니다.
    authHandler();
  }, []);

  return (
    <BrowserRouter>
      <div className='main'>
        <Routes>
          <Route
            path='/'
            element={
              isLogin ? (
                <Mypage
                /*
                TODO: 렌더링에 필요한 App의 상태와 이를 하위 컴포넌트에서 변경할 수 있도록 props를 전달하세요.
                */
                />
              ) : (
                <Login
                /*
                TODO: App의 상태를 변경할 수 있도록 props를 전달하세요.
                */
                />
              )
            }
          />
        </Routes>
      </div>
    </BrowserRouter>
  );
}

export default App;
튜토리얼
  const authHandler = () => {
    axios
      .get('http://localhost:4000/userinfo') // 엔드포인트 입력
      .then((res) => {
        setIsLogin(true);
        setUserInfo(res.data); // 인증에 성공했다면 로그인 데이터 전송
      })
      .catch((err) => {
        if (err.response.status === 401) {
          console.log(err.response.data); // 인증 실패시 401 상태오ㅓㅏ 함께 에러메시지
        }
      });
  };

  ...

                isLogin ? (
                <Mypage
                // props 전달
                  isLogin={isLogin}
                  setIsLogin={setIsLogin}
                  setUserInfo={setUserInfo}
                  userInfo={userInfo}
                />
              ) : (
              // props 전달
                <Login setIsLogin={setIsLogin} setUserInfo={setUserInfo} />
              )
client/src/pages/Mypage.js
import axios from 'axios';
import React from 'react';

export default function Mypage({ userInfo, setIsLogin, setUserInfo }) {
  const logoutHandler = () => {
  // logout 엔드포인트 작성 login false 해준다
    return axios
      .post('http://localhost:4000/logout')
      .then((res) => {
        setUserInfo(null);
        setIsLogin(false);
      })
      .catch((err) => {
        alert(err);
      });
  };

  return (
    <div className='container'>
      <div className='left-box'>
        <span>
          {`${userInfo.name}(${userInfo.userId})`}님,
          <p>반갑습니다!</p>
        </span>
      </div>
      <div className='right-box'>
        <h1>AUTH STATES</h1>
        <div className='input-field'>
          <h3>내 정보</h3>
          <div className='userinfo-field'>
            <div>{`💻 ${userInfo.position}`}</div>
            <div>{`📩 ${userInfo.email}`}</div>
            <div>{`📍 ${userInfo.location}`}</div>
            <article>
              <h3>Bio</h3>
              <span>{userInfo.bio}</span>
            </article>
          </div>
          <button className='logout-btn' onClick={logoutHandler}>
            LOGOUT
          </button>
        </div>
      </div>
    </div>
  );
}
2. 서버 : 로그인 요청을 처리하기
server/src/controller/user/Login.js
const { USER_DATA } = require('../../db/data');

module.exports = (req, res) => {
  const { userId, password } = req.body.loginInfo;
  const { checkedKeepLogin } = req.body;
  const userInfo = {
    ...USER_DATA.filter((user) => user.userId === userId && user.password === password)[0],
  };

  /*
   * TODO: 로그인 로직을 구현하세요.
   *
   * userInfo에는 요청의 바디를 이용해 db에서 조회한 유저정보가 담겨있습니다. 콘솔에서 userInfo를 출력해보세요.
   * 유저의 정보가 출력된다면 해당 유저가 존재하는 것임으로 로그인 성공에 대한 응답을 전송해야 합니다.
   * 만약 undefined가 출력된다면 해당하는 유저가 존재하지 않는 것임으로 로그인 실패에 대한 응답을 전송해야 합니다.
   *
   * 로그인 성공 시에는 클라이언트에 쿠키를 전송해야합니다. 쿠키의 cookieId에는 userInfo.id가 담겨야 합니다.
   * 테스트케이스에서 요구하는 쿠키 옵션을 모두 설정하세요.
   * 영속성있는 쿠키를 보내려면 max-age 또는 expires 옵션을 설정하세요.
   *
   * 클라이언트에게 바로 응답을 보내지않고 서버의 /useinfo로 리다이렉트해야 합니다.
   * express의 res.redirect 메서드를 참고하여 서버의 /userinfo로 리다이렉트 될 수 있도록 구현하세요.
   */
};
튜토리얼
userInfo란? server/db/data/js에서 가져온 정보를 필터링해서 req.body로 들어온 아이디,
비밀빈호와 일치하는 유저 정보만을 남긴다
const userInfo = {
    ...USER_DATA.filter((user) => user.userId === userId && user.password === password)[0],
  };
... // 쿠키옵션 변수를 만들어 로그인 성공시 응답 전송 실패 시 실패 응답 전송을 할 수 있도록 한다 const cookieOptions = { //쿠키 옵션 종류 domain: 'localhost', path: '/', sameSite: 'none', secure: true, expires: new Date(Date.now() + 24 * 3600 * 1000 * 7), // 7일 후 소멸되는 Persistent Cookie httpOnly: true, }; // userInfo의 id가 아닐시 실패 메시지와 함께 401에러 if (!userInfo.id) { res.status(401).send('Not Authorized'); // 로그인 유지 체크 시 로그인 정보가 유지 되도록 redirect 함수 사용 } else if (checkedKeepLogin) { res.cookie('cookieId', userInfo.id, cookieOptions); res.redirect('/userinfo'); // 그렇지 않을 시 delete cookieOptions.expires; } else { delete cookieOptions.expires; res.cookie('cookieId', userInfo.id, cookieOptions); // Expires 옵션이 없는 Session Cookie res.redirect('/userinfo'); } };server/src/controller/user/userInfo.js
const { USER_DATA } = require('../../db/data');

module.exports = (req, res) => {
  /*
   * TODO: 쿠키 검증 여부에 따라 유저 정보를 전달하는 로직을 구현하세요.
   *
   * 로그인 시 설정한 쿠키가 존재하는 지 확인해야 합니다.
   * 아직 로그인을 하지 않았다면 쿠키가 존재하지 않을 수 있습니다.
   * 쿠키에 유저의 id가 존재하는지 확인하고 싶다면 콘솔에 req.cookies를 출력해보세요.
   */
   // 튜토리얼
     const cookieId = req.cookies.cookieId;
  const userInfo = { ...USER_DATA.filter((user) => user.id === cookieId)[0] };
  if (!cookieId || !userInfo.id) {
    res.status(401).send('Not Authorized');
  } else {
    delete userInfo.password;
    res.json(userInfo);
  }
};
server/src/controller/user/logout.js
module.exports = (req, res) => {
  res
    .status(205)
    .clearCookie('cookieId', {
      domain: 'localhost',
      path: '/',
      sameSite: 'none',
      secure: true,
    })
    .send('Logged Out Successfully');
};
결과
 반응형
반응형'codeStates front-end > node(server)' 카테고리의 다른 글
[인증/보안] Token (0) 2023.03.08 [인증/보안] Session (0) 2023.03.08 [네트워크] 심화, TCP/IP, 네트워크 계층 모델, OSI 7계층 모델, ... (0) 2023.03.06 웹 표준 & 접근성 (0) 2023.02.28 JSON.stringify (0) 2023.02.14