-
<react-native>view 컴포넌트와 css 박스 모델/자원과 아이콘 사용하기app/react-native 2022. 4. 11. 12:55반응형
react-native-paper color 패키지 먼저 설치
npm i react-native-vector-icons react-native-paper color
npm i -D @types/color
app.tsx
import React from 'react'
import {Platform, Dimensions, StyleSheet, SafeAreaView, Text} from 'react-native'
import {Colors} from 'react-native-paper'
import color from 'color'

const {width, height} = Dimensions.get('window')

export default function App() {
  return (
    <SafeAreaView style={[styles.SafeAreaView]}>
      <Text style={[styles.text]}> os: {Platform.OS}</Text>
      <Text style={[styles.text]}> width: {width} px</Text>
      <Text style={[styles.text]}> height: {height} px</Text>
    </SafeAreaView>
  )
}
const styles = StyleSheet.create({
  SafeAreaView : {backgroundColor:Colors.blue500},
  text:{fonsSize:20, color:color(Colors.blue500).lighten(0.9).string()}
})
실행결과

imagebackground 코어 컴포넌트 사용하기
이를 사용하기 위해서는 faker 패키지 또한 필요하다
faker 설치
npm i faker
npm i -D @types/faker
app.tsx
import React from 'react'
import {StyleSheet, SafeAreaView, ImageBackground} from 'react-native'

export default function App(){
  return (
     <SafeAreaView style={[styles.flex]} >
  <ImageBackground
  style={[styles.flex]}
  source={require('./src/assets/images/bg.jpg')}
  />
  </SafeAreaView>
  )
}
const styles = StyleSheet.create({
  flex : {flex: 1}
})
사진은 그냥 위에 경로로 넣어주면 끝!
실행결과
image 코어 컴포넌트
이때 전에 했던 faker data를 가져와야하는데
공부하신분들은 알아서 cp 복사해서 가져오시면됨니당
import React from "react";
//prettier-ignore
import {StyleSheet, SafeAreaView, ImageBackground, Image} from "react-native"
import * as D from './src/data'

const avatarUrl = D.randomAvatarUrl()
const avatarSize = 50

export default function App(){
  return (
     <SafeAreaView style={[styles.flex]} >
        <ImageBackground
        style={[styles.flex, styles.imageBackground]}
        source={require('./src/assets/images/bg.jpg')}>
       <Image source={{uri: avatarUrl}} style={[styles.image]} />
      </ImageBackground>
      </SafeAreaView>
     )
    }

const styles = StyleSheet.create({
  flex : {flex: 1},
  imageBackground : {padding : 10},
  image : {width: avatarSize, height: avatarSize, borderRadius : avatarSize /2}
})
실행결과
위의 아바타 생긴 거 보이나용 *^^*~~,~~
사진도 바꿔봤어용

폰트 직접 설치하고 사용하기
폰트는 Daincing Script Download family

여기에 font 넣어주고
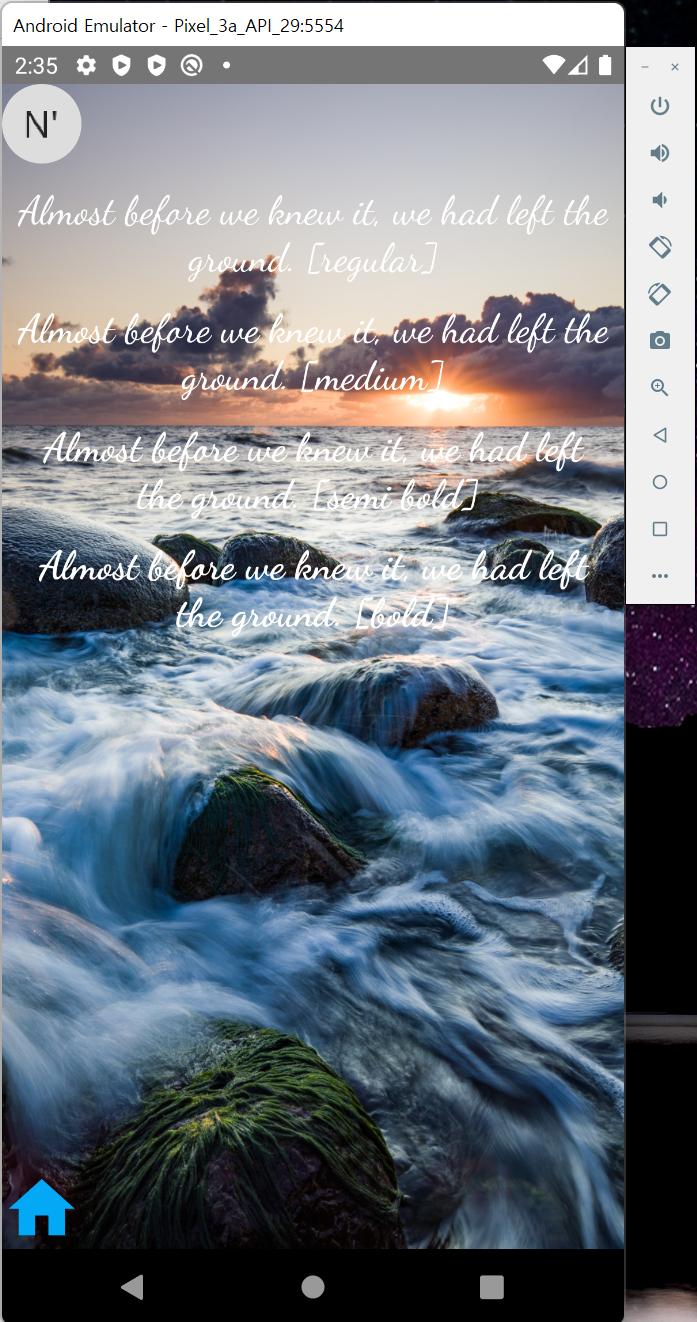
홈 아이콘 까지 넣은 소스입니당
import React from "react";
//prettier-ignore
import { StyleSheet , Platform, SafeAreaView, ImageBackground, Image, View, Text, Alert} from "react-native"
import { Colors } from "react-native-paper";
import Icon from 'react-native-vector-icons/MaterialCommunityIcons'
import * as D from './src/data'

const avatarUrl = D.randomAvatarUrl()
const avatarSize = 50

const text = 'Almost before we knew it, we had left the ground.'
const onIconPressed = () => Alert.alert('icon pressed')

//prettier-ignore
export default function App(){
  return (
    <SafeAreaView style={[styles.flex]}>
      <ImageBackground style={[styles.flex, styles.imageBackground]}
        source={require('./src/assets/images/bg.jpg')}>
        <Image source={{uri: avatarUrl}} style={[styles.image]}/>
        <View style={[styles.flex, styles.padding10]}>
          <Text style={[styles.text, styles.regular]}>{text} [regular]</Text>
          <Text style={[styles.text, styles.medium]}>{text} [medium]</Text>
          <Text style={[styles.text, styles.semiBold]}>{text} [semi bold] </Text>
          <Text style={[styles.text, styles.bold]}>{text} [bold]</Text>
        </View>
        <Icon name="home" size={50} color={Colors.lightBlue500}
          onPress={onIconPressed} />
        </ImageBackground>
    </SafeAreaView>
  )
}
//prettier-ignore
const styles = StyleSheet.create({
  flex:{flex: 1},
  imageBackground: {flex:1},
  image : {width: avatarSize, height:avatarSize, borderRadius:avatarSize/2},
  padding10: {padding: 10},
  text : {textAlign: 'center', fontSize: 25, color: 'white', marginBottom: 10},

  regular: {fontFamily: 'DancingScript-Regular', fontWeight: '400'},
  medium: {fontFamily: 'DancingScript-Medium', fontWeight:'500'},
  semiBold: {fontFamily: 'DancingScript-SemiBold', fontWeight: '600'},
  bold : {
    fontFamily: 'DancingScript-Bold',
    fontWeight: Platform.select({ios:'700', android: '600'})
  }
})
실행결과
쫙쫙쫙
반응형'app > react-native' 카테고리의 다른 글
<react-native>mission 앱 제작1_메인화면, 로그인, 홈 화면, ... (0) 2022.05.18 <react-native> faker / error 확인 (1) 2022.04.09 <react-native> style 속성과 styleSheet API ... (0) 2022.04.09 <react-native> Button, alert, ... (0) 2022.04.09 react-native를 시작하면서/window 개발환경 설정/오류 해결_2 (0) 2022.04.06